
What Are Jamberry Nail Wraps?
Jamberry Nail Wraps are a solid film covering that can be applied directly to the nail to achieve a look not found anywhere else. This special material is both pressure and heat activated to create a water tight bond to your nail. The shields are made in the USA, with no harsh chemicals and are latex free.
This new nail treatment can be applied in about fifteen minutes at home. With over three hundred styles to choose from, these designer wraps are made to last up to two weeks on fingers and 6 weeks on toes. Unlike traditional nail polish, they won’t chip and require no drying time. It’s so easy to achieve a professional, salon look at a fraction of the cost.
Jamberry Nail Wraps are the newest way to accessorize your fingers and toes! Get your own unique, professional nail design and say “goodbye!” to nail polish. With today’s hottest celebrities already wearing unique nail designs, it’s quickly becoming a fashion “must have.
Tools of the Trade...
How to Prep and Apply Your Jamberry Nail Wraps?
1. First if you have any nail polish on, remove that with Nail polish remover. Then WASH your hands with common Grease Fighting Dish Soap. This Helps remove any oils that you naturally have on your nails. If you have really oily Nail Beds, you can soak your nails in the soap for a few minutes, then wash your hands.


5, Next, choose the Nail Wrap that fits your finger. If you are in between sizes, go smaller. You don't want the Wrap to Touch your skin. I made Templates of my Nails to make selection easier and it allows me to cut wraps to fit my nail perfectly EVERY time. The templates also allow me to be more frugal and get more applications out of my wraps. If you would like to see how to make templetes of your nails, here is the link.....making-nail-templates-for-your-jamberry


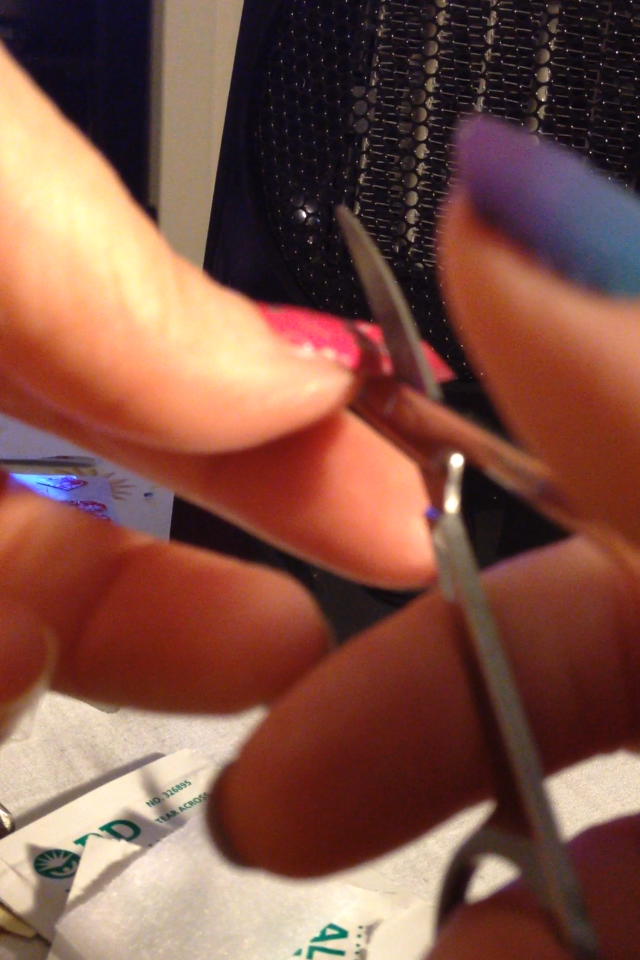


10. File off the excess wrap at a 90 degree angle to your nail, only in a downward motion. Aggresive Filing is not nessarry and may damage the wrap. Once you start filing downward you will start to see the excess roll off. If your nails do not extend past your finger tip, use cuticle clippers to cut the excess off.
11. If you have any creasing or buckling, I found that using a rice bag helps to warm the wrap, while smoothing it out. I have pre-made Rice bags if anyone is interested.


10. Finally once you have a water tight seal, apply Cuticle oil to your nails, to keep your nails nurished. Jamberry has Cuticle oil. I use Coconut oil, because I have a ton of it.
 You can also use coconut oil to remove your wraps. See the Video Below.
Ta-Da!


Here are some of the Reasons I fell in LOVE with these Wraps

They Have Nail Lacquer TOO!

And who can say NO to a SALE!

Here is Jamberry's Offical Application Video:
And Here is how I like to Remove My Jamberry's.
.jpg)
Visit my Face book Page:
or my Jamberry Page to Order:

No comments:
Post a Comment